Hello Programmers, Welcome to the TheCodingHubs Bog. In this blog, we are going to build a Resume Generator App Using Python. To Build a graphical user interface (GUI) of a Billing Management System Using HTML, CSS and JavaScript. we are going to use the Flask web framework and reportlab library. The specifics include education, experience, talents, grades, and other important information that we usually put on our resumes.
I am a Programmer and Content creator, writing programs and blogs since 2015 and I know how to program in Python programming languages easily and step by step.
What is the Resume Generator App?
An easy-to-use tool that makes creating resumes simpler is the Resume Generator App. Users can quickly input details as it organizes important information into parts like Education, Skills, Experience, Projects, Achievements, and Other Activities. With a strong focus on projects, achievements, skills for job experiences, extracurricular activities, and academic achievements, this automatic method guarantees a well-organized and aesthetically pleasing CV. Recently I created a Billing Management System Using Python I believe you will also help to enhance your programming skills.
Video to set up the project
Prerequisites To Resume Generator App Using Python
To draw the build To Resume Generator App Using Python. we need a Python library. Here is an overview description of this library.
ReportLab: The Toolkit for ReportLab. A free and open-source Python package for creating images and PDFs. Install all the ReportLab library by running the following command. Run the command in the command prompt.
pip install reportlab
Flask: With the help of Flask Libraries, developers can create lightweight web apps with simplicity and rapidity using the Flask web framework. Install Flask using the command given below. Run the command in the command prompt
pip install flask
After you install the Flask and ReportLab. Write the code for the Resume Generator App Using Python.
File Structure of the Resume Generator App Using Python
The file structure of the resume generator as mentioned below.
Resume Generator/
│   app.py
│
└───static/
│   └───css/
│       │   style.css
|       |
|       └───js/
|            |  app.js
│
└───templates/
     │   index.html
     |   resume.html
     |   tips.html
Code of Resume Generator App Using Python
Step 1: Write HTML Code (index.html)
<!DOCTYPE html>
<html lang="en">
<head>
    <meta charset="UTF-8">
    <meta name="viewport" content="width=device-width, initial-scale=1.0">
    <title>Resume Builder</title>
    <link rel="stylesheet" href="https://cdnjs.cloudflare.com/ajax/libs/font-awesome/5.15.3/css/all.min.css">
    <link rel="stylesheet" href="{{ url_for('static', filename='css/style.css') }}">
</head>
<body>
    <div class="container">
        <header>
            <h1><i class="fas fa-briefcase"></i> Resume Builder</h1>
        </header>
        <form method="POST" action="/" class="form-container">
            <div class="input-group">
                <i class="fas fa-user"></i>
                <input type="text" name="name" placeholder="Full Name" required>
            </div>
            <div class="input-group">
                <i class="fas fa-envelope"></i>
                <input type="email" name="email" placeholder="Email" required>
            </div>
            <div class="input-group">
                <i class="fas fa-phone"></i>
                <input type="text" name="contact" placeholder="Contact Number" required>
            </div>
            <div class="input-group">
                <i class="fas fa-briefcase"></i>
                <input type="text" name="role" placeholder="Job Role" required>
            </div>
            <div class="input-group">
                <i class="fas fa-align-left"></i>
                <textarea name="profile" placeholder="Profile Summary" required></textarea>
            </div>
            <div class="input-group">
                <i class="fas fa-graduation-cap"></i>
                <textarea name="education" placeholder="Education" required></textarea>
            </div>
            <div class="input-group">
                <i class="fas fa-graduation-cap"></i>
                <textarea name="additional_education" placeholder="Additional Education" required></textarea>
            </div>
            <div class="input-group">
                <i class="fas fa-briefcase"></i>
                <textarea name="experience" placeholder="Work Experience" required></textarea>
            </div>
            <div class="input-group">
                <i class="fas fa-briefcase"></i>
                <textarea name="past_experience" placeholder="Past Experience" required></textarea>
            </div>
            <div class="input-group">
                <i class="fas fa-lightbulb"></i>
                <input type="text" name="skills" placeholder="Skills (comma-separated)" required>
            </div>
            <div class="input-group">
                <i class="fas fa-project-diagram"></i>
                <textarea name="projects" placeholder="Projects" required></textarea>
            </div>
            <button type="submit"><i class="fas fa-paper-plane"></i> Generate Resume</button>
        </form>
        <footer>
            <a href="/tips"><i class="fas fa-info-circle"></i> Resume Tips and Tricks</a>
        </footer>
    </div>
</body>
</html>
Step 2: Write HTML Code (resume.html)
<!DOCTYPE html>
<html>
<head>
    <title>Resume</title>
    <!-- Update the link to use an absolute URL -->
    <link rel="stylesheet" href="{{ url_for('static', filename='css/style.css', _external=True) }}">
</head>
<body>
    <div class="resume">
        <h1>{{ details.name }}</h1>
        <p><strong>Email:</strong> {{ details.email }}</p>
        <h2>Profile</h2>
        <p>{{ details.profile }}</p>
        <h2>Education</h2>
        <p>{{ details.education }}</p>
        <h2>Experience</h2>
        <p>{{ details.experience }}</p>
        <h2>Skills</h2>
        <ul>
            {% for skill in details.skills %}
            <li>{{ skill }}</li>
            {% endfor %}
        </ul>
        <h2>Projects</h2>
        <p>{{ details.projects }}</p>
    </div>
</body>
</html>
Step 3: Write HTML Code (tips.html)
<!DOCTYPE html>
<html>
<head>
    <title>Resume Tips</title>
    <link rel="stylesheet" href="{{ url_for('static', filename='css/style.css') }}">
</head>
<body>
    <div class="container">
        <h1>Resume Tips and Tricks</h1>
        <ul>
            <li>Keep your resume concise and relevant.</li>
            <li>Use bullet points for clarity.</li>
            <li>Highlight your achievements with concrete data.</li>
            <li>Tailor your resume for the job you're applying for.</li>
            <li>Include keywords from the job description.</li>
            <li>Focus on skills and experiences that are relevant to the job.</li>
        </ul>
        <a href="/">Back to Resume Builder</a>
    </div>
</body>
</html>
Step 4: Write CSS Code (style.css)
body {
    font-family: 'Arial', sans-serif;
    background-color: #2e1534;  /* Dark purple background */
    color: #ccc;                /* Light grey text for better readability on dark background */
}

.container {
    width: 80%;
    margin: auto;
    padding: 20px;
    box-shadow: 0 4px 8px rgba(0,0,0,0.5); /* Darker shadow for depth */
    background-color: #3c1f5a; /* Slightly lighter purple for contrast */
    border-radius: 8px;
}

.header, .footer {
    text-align: center;
    padding: 10px 0;
}

.input-group {
    margin: 10px 0;
    display: flex;
    align-items: center;
}

.input-group i {
    margin-right: 10px;
    color: #b39ddb; /* Lavender color for icons */
}

input[type="text"], input[type="email"], textarea {
    width: 100%;
    padding: 10px;
    border: 1px solid #764ba2; /* Purple borders */
    border-radius: 5px;
    box-sizing: border-box;
    transition: border-color 0.3s;
    background-color: #241634; /* Very dark purple background for input fields */
    color: #ccc; /* Light grey text */
}

input[type="text"]:focus, input[type="email"]:focus, textarea:focus {
    border-color: #dec20b; /* Yellow focus for visibility */
}

button {
    background-color: #6a1b9a; /* Deeper purple for button */
    color: white;
    padding: 10px 20px;
    border: none;
    cursor: pointer;
    width: 100%;
    border-radius: 5px;
    transition: background-color 0.3s;
}

button:hover {
    background-color: #9c27b0; /* Lighter purple on hover */
}

footer {
    margin-top: 20px;
}

footer a {
    color: #b39ddb; /* Lavender for footer links */
    text-decoration: none;
}

footer a:hover {
    text-decoration: underline;
}
Step 5: Write JavaScript Code (app.js)
document.addEventListener("DOMContentLoaded", function() {
    // Any JavaScript needed for interactivity can be added here.
});
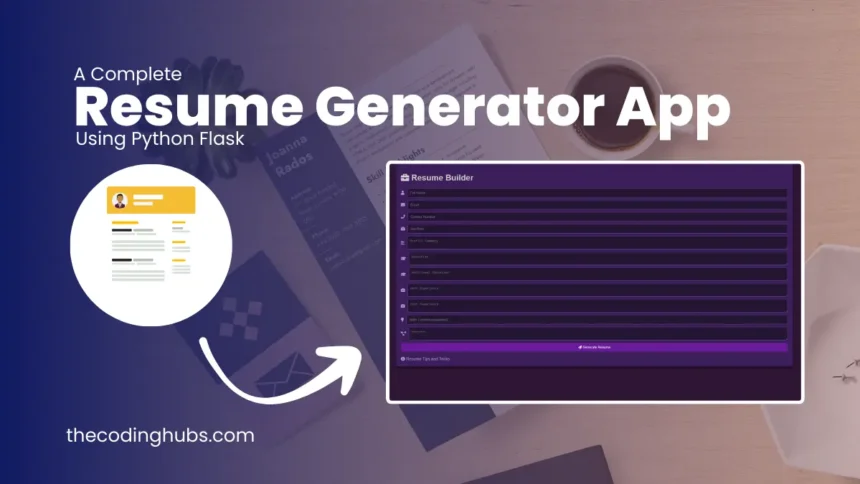
Output of Resume Generator App Using Python
Here is the output of the Resume Generator App Using Python which we build in the blog.

Clicking the download option will allow you to get the source code files for this Resume Generator App Using Python at no cost. This will be helpful if you are having trouble making your code or if it isn’t functioning as it should.
Download Resume Generator App
Conclusion
In this blog, I shared how to build a Resume Generator App Using Python. I hope you enjoyed reading this blog and found helpful information on the Resume Generator App Using Python. So finally we have completed this Resume Generator App Using Python I hope this blog will benefit you if you have any questions you can ask me in the comment section.