
Hello, guys welcome to The Coding Hubs blog today in this blog we are going to create a contact form with HTML and CSS. In the Contact form, the user can enter the contact information and you will receive the inquiry on your email ID. We will create this contact Form with HTML and CSS with the help of HTML and CSS and we will add just one line of API link that will send the inquiries to your email ID
It’s very simple to create this working contact form with HTML and CSS so let’s start to create a working contact form. Contact Form with HTML and CSS
What is a Contact Form?
By using the contact form the user can send their name, email, and message. We can also take user numbers, dates, images, passwords, files, and many other inputs. In this blog, we are going to take the name, email, and message from the user.
Features
Integrating the Web3 Forms API: Find out how to include the Web3 Forms API to make it easier for questions to be sent from the contact form straight to your email.
Detailed Styling: Use intricate CSS styling to match the style of your website with the appearance and feel of your contact form.
Email Integration: for a smooth connection with your website users, confirm that the contact form correctly receives and displays submitted data in your email inbox.
Read More: Netflix clone using HTML, CSS, and JavaScript
The Process to Integrate web3forms
Step 1: Go to the web3froms website. Enter your email ID to get your access key
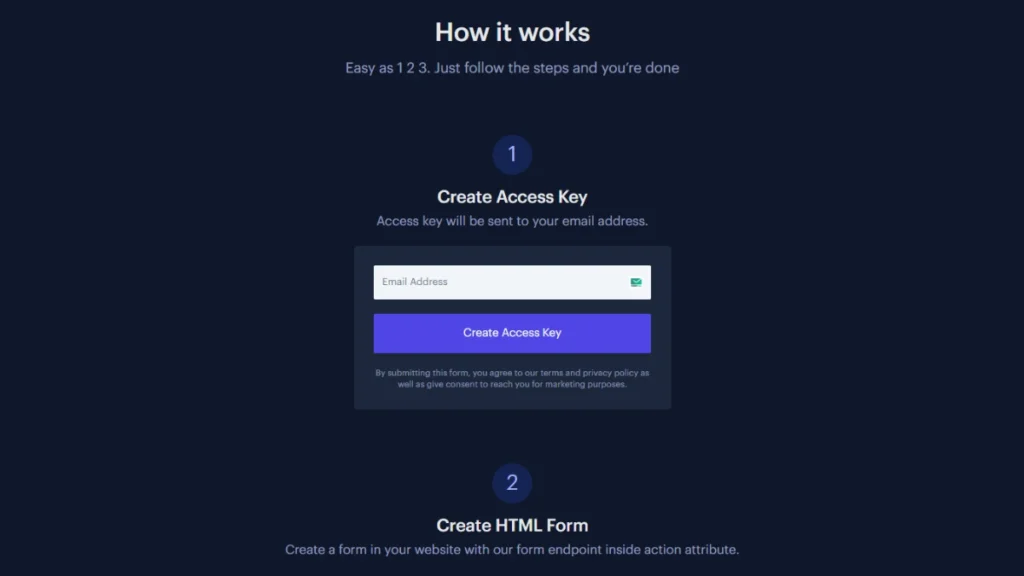
Step 2: you will receive the access key on your mail ID.
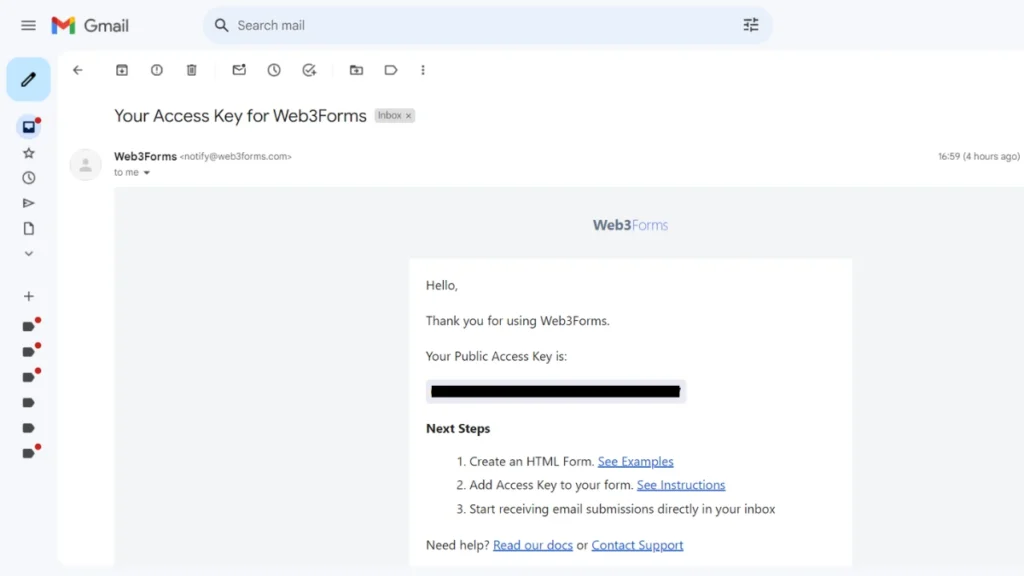
Step 3: Copy this Access Key. In the code, I have mentioned “YOUR_ACCESS_KEY_HERE”. paste this access key there. and you are done
Read More: Create BMI Calculator Using HTML, CSS, and JavaScript
Contact Form with HTML and CSS Source Code
HTML Code
<!DOCTYPE html>
<html lang="en">
<head>
    <meta charset="UTF-8">
    <meta name="viewport" content="width=device-width, initial-scale=1.0">
    <title>Contact Form</title>
</head>

<body>
    <div class="container">
        <div class="picture-container">
            <div class="picture">
                <img src="customer-support.gif">
            </div>
        </div>
        <div class="contact-form-container">
            <form action="https://api.web3forms.com/submit" method="POST" class="contact-form">
                <span class="form-header">Contact us</span>
                <input type="hidden" name="access_key" value="YOUR_ACCESS_KEY_HERE">
                <input type="text" name="name" class="input" placeholder="Your Name" />
                <input type="email" name="email" class="input" placeholder="Your Email" />
                <textarea name=" message" cols="30" rows="5" placeholder="Enter Your message" class="input"
                    required></textarea>
                <button class="submit" type="submit">Submit</button>
            </form>
        </div>
    </div>
</body>
</html>
CSS Code
html,body {
    background: rgb(112, 104, 255);
    height: 100%;
    display: flex;
    flex-direction: column;
    justify-content: center;
    align-items: center;
    font-family: 'Montserrat', sans-serif;
    }

.container {
    background: #fff;
    width: 800px;
    height: 450px;
    border-radius: 24px;
    box-shadow: 16px 16px 8px rgba(0, 0, 0, .1);
    display: flex;
    justify-content: center;
    align-items: center;
    }

.picture-container {
    width: 50%;
    height: 100%;
    align-self: flex-start;
    display: flex;
    justify-content: center;
    align-items: center;
    }

.picture img {
   width: 320px;
   }

 .contact-form-container {
   height: 90%;
   width: 300px;
   }

.contact-form {
   height: 100%;
   width: 100%;
   display: flex;
   flex-wrap: wrap;
   align-content: space-around;
   }

.form-header {
   font-size: 2em;
   font-weight: 700;
   align-self: flex-start;
   }

.input {
   border: none;
   outline: none;
   background: #eee;
   padding: 15px;
   border-radius: 6px;
   width: 100%;
   font-size: 100%;
   font-family: 'Montserrat', sans-serif;
   }

.submit {
   border: none;
   outline: none;
   color: #fff;
   width: 100%;
   padding: 20px;
   background: #8870FF;
   font-size: 100%;
   font-weight: 600;
   border-radius: 6px;
   transition: transform 300ms 0s cubic-bezier(0, 0.23, 0.29, 2.45);
   }

.submit:hover {
   cursor: pointer;
   background: #7F69EE;
   transform: translateY(-2px);
   }

::placeholder {
    font-family: 'Montserrat', sans-serif;
    opacity: 0.5;
   }
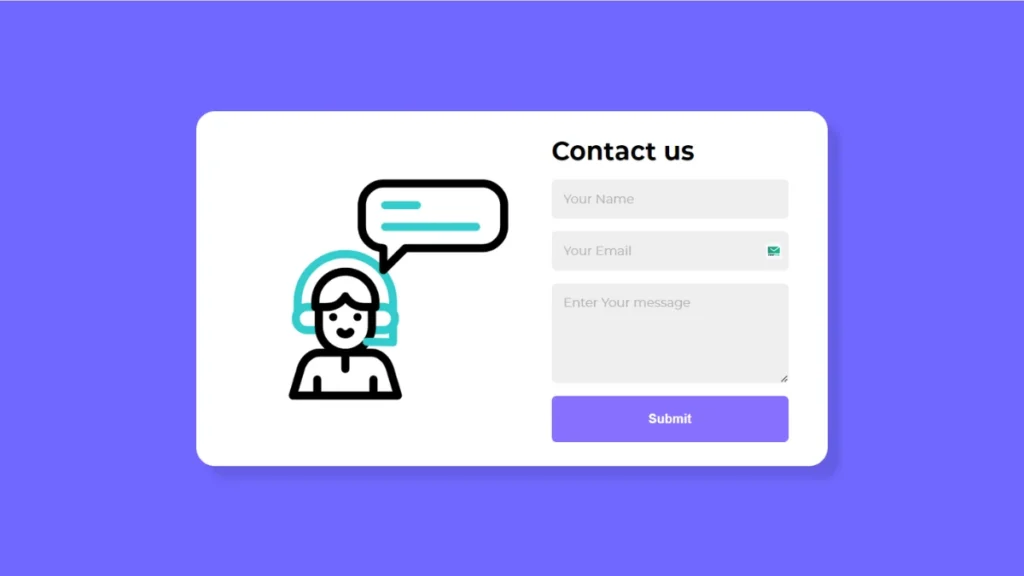
Output of Contact Form with HTML and CSS
Conclusion
In this blog, I shared how to Create a Contact Form with HTML and CSS. hope you enjoyed reading this blog and found the information provided on Create a Contact Form with HTML and CSS helpful. if you have any questions you can ask me in the comment section
Hello,
Wondering if you accept guest posts or link inserts on existing posts on thecodinghubs.com?
How much would you charge for this?
Justin
Mail Us at : codinghubofficial@gmail.com